Barrie Home Inspector

Home Maintenance and Tips for Home Owners

Tag: moisture

Barrie Home Inspector and Thermal Imaging

Barrie Home Inspector and Thermal Imaging. Combine Infrared Scanning & Home Inspection for your next Barrie Home Inspection.  Free Thermal Imaging scans of your Exterior walls and Main electrical panel included with your home inspection package.

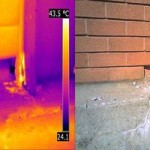
Heat Loss at brickThermal imaging cameras detect radiation in the infrared range of the electromagnetic spectrum (roughly 9,000-14,000 nanometers or 9-14 m) and produce images of that radiation, called thermograms. Since infrared radiation is emitted by all objects above absolute zero according to the black body radiation law, thermography makes it possible to see one’s environment with or without visible illumination.

The discovery of infrared started with a prism being placed into a ray of sunshine in a dark room which then reflected the colours of the rainbow using a property known as dispersion. This is the method Sir William Herschel utilized in the 1800′s in conjunction with thermometers to discern the presence of invisible light rays. He called his discovery the thermometric spectrum later to be known as infrared.

Thermal Imaging can be used for detection of potential equipment failure by measuring abnormal temperature signatures of electrical distribution system components. By evaluating the operating condition of these components, potential failure can be located and problem severity determined as part of a structured ongoing maintenance program.

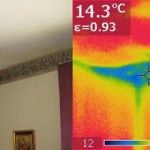
Missing Insulation in Corner

When using a thermal imaging camera a special lens focuses the infrared light emitted by all of the objects in view. The focused light is scanned by a phased array of infrared-detector elements. The detector elements create a very detailed temperature pattern called a thermogram. It only takes about one-thirtieth of a second for the detector array to obtain the temperature information to make the thermogram. This information is obtained from several thousand points in the field of view of the detector array.

Light is often said to have a colour temperature. What this means is that the colour of the light is the colour of light radiated by a so-called black body which is at that temperature. Colour temperature is measured in Kelvins and the higher the colour temperature the bluer the light. Zero Kelvin is Absolute Zero and the freezing point of water is 273 Kelvins: a Kelvin degree is the same as a Celsius or Centigrade degree. In practice the actual temperature is not the same as the colour temperature.

Thermal Imaging has evolved into one of the most valuable diagnostic tools used for Predictive Maintenance (PM). Also known as Thermography, Thermal Imaging is the production of non-contact infrared, or “heat” pictures from which temperature measurements can be made. By detecting anomalies often invisible to the naked eye, thermography allows corrective action before costly system failures occur. Portable infrared (IR) imaging systems scan electrical systems, then constantly convert the thermal images to visible pictures for quantitive temperature analysis.

The Barrie Home Inspector was the first company in Simcoe County to offer Thermal Imaging as part of a Home Inspection.  Our training, experience and knowledge make us the Premier Home Inspection company for residential or commercial property investment.

Commercial Property Inspector – Barrie

Commercial Property Inspector – Barrie is a Certified Building Code Official. He has attained the required training and education with the Ontario Building Officials Association and is fully qualified on Large Buildings and Part 3 of the Ontario Building Code. An unknowing inspector may lead you to believe your property is code compliant when you could in fact be faced with spending thousands or tens of thousands in required building code upgrades.

Aluminum Wiring: In the late 1960′s and early 1970′s copper prices rose and contractors/electricians switched from copper to lower costing aluminum wiring. Concerns with this type of wiring have arisen, for example, when aluminum wire is connected to devices (eg. receptacles, light fixtures) which were not designed for aluminum, or, when aluminum and copper wires are attached. In these cases a reaction can occur causing the connections to fail, perhaps become disconnected, and/or, potentially overheat, spark and catch fire. Symptoms of this can sometimes be seen in the discolouration of receptacles, flickering lights, or the smell of hot plastic insulation.

Asbestos became increasingly popular among manufacturers and builders in the late 19th century because of its sound absorption, average tensile strength, its resistance to fire, heat, electrical and chemical damage, and affordability. It was used in such applications as electrical insulation for hotplate wiring and in building insulation. When asbestos is used for its resistance to fire or heat, the fibers are often mixed with cement (resulting in fiber cement) or woven into fabric or mats. All types of asbestos fibers are known to cause serious health hazards in humans. Removing asbestos from a property can be expensive and time consuming. Personnel have to be licensed to perform asbestos removal.

Mould: Leaking roofs or basements can lead to an excess of moisture in your crawl space, basement or storage areas of your building or office. The best reason is to avoid the growth of fungus, mold, or mildew that may decay and destroy wood and potentially your indoor air quality. Moisture in any form provides the missing ingredient for spores to thrive and grow in its environment. Having your property or building inspected can prevent expensive clean up costs that might be incurred after you purchase a property.

Thermal imaging (infrared camera) is used on all our commercial property inspections. This amazing technology can aid in the detection of heat loss, moisture, water leaks, over-heating conditions and even mould detection. We also perform moisture checks with our up-graded digital moisture detector which allows us to detect moisture up to an inch behind most building products.

The Commercial Property Inspector has been in business for 7 years and has performed over 4,000 inspections. As a Certified Building Code Official with the Ontario Building Officials Assc he has master the Ontario Building Code by completing all the Part 9 (small buildings) and Part 3 (large buildings over 600 m2) which enables him to use this experience when inspecting your commercial real estate investment. All inspections are performed to ASTM E2018 standard and report is based on PCA format.

Looking to find Toronto Commercial Property Inspections, then visit www.commercialbuildinginspector.ca to find the best advice on GTA Commercial Property Inspections for your next investment.

Concrete – Supporting Your Home

Concrete – Supporting Your Home. The word concrete comes from the Latin word “concretus” (meaning compact or condensed), the perfect passive participle of “concrescere”, from “con-” (together) and “crescere” (to grow).  Most information available about concrete is written for contractors, for those who design concrete mixes, and for those who perform invasive testing.

In evaluating concrete problems, one of the important decisions home inspectors must make is determining whether a problem is the result of conditions that have stabilized with a low chance of continuing future problems, or whether the conditions that caused the problem are such that there is a high probability that problems will continue or worsen.

Different factors can affect concrete and the problems that inspectors will see.  How concrete hardens, strengthens and the qualities of its surface depend on a number of things, including the properties of its constituent materials.  Although Portland cement is the most commonly used binder, pozzolans may be substituted. Pozzolans are materials that, in addition to undergoing primary hydration, undergo a secondary hydration, producing a gel that fills tiny voids between cement particles, making concrete less porous and less likely to absorb moisture or chemical solutions that can damage concrete or steel reinforcement.

The constituent materials which are included in the mix, their proportions, the order in which they are combined, the length of time and method by which they are mixed, and the length of time between mixing to placing all affect the quality of concrete. With each decision and operation, there is a chance that mistakes will be made. The environmental conditions that exist during placing, finishing and curing concrete will have an effect on how it develops. The ground and air temperatures, wind speed, cloud cover, and the absorbent qualities of the substrate will affect newly placed concrete.

When initially mixed together, Portland cement and water rapidly form a gel, formed of tangled chains of interlocking crystals. These continue to react over time, with the initially fluid gel often aiding in placement by improving workability. As the concrete sets, the chains of crystals join and form a rigid structure, gluing the aggregate particles in place. During curing, more of the cement reacts with the residual water (hydration).  This curing process develops physical and chemical properties. Among these qualities are mechanical strength, low moisture permeability and chemical and volumetric stability.

Cracks that appear before the concrete has hardened are called plastic cracks.  Plastic cracks are typically due to poor mix design, placement practices or curing methods, and may also be caused by settlement, construction movement, and excessively high rates of evaporation. Cracks that appear after concrete has hardened can have a variety of causes, and sometimes have more than one cause.

Plastic shrinkage is shrinkage caused by the loss of water to the atmosphere. Autogenous shrinkage is shrinkage that takes place with no loss of water to the atmosphere.  Autogenous shrinkage is caused by internal drying, with water being absorbed by the constituent materials in the concrete.  As the long-term chemical hydration process continues – and it can continue for many years — water in the pores within the cement paste is absorbed, and the pores are filled, to some degree, by materials produced during hydration. This process leads to decreased permeability and increased strength and durability of the cement paste. Absorption of water from the pores also causes shrinkage.

When purchasing a new property it is important to have the building inspected by a qualified residential or commercial inspector.  Trust the Barrie Home Inspector for your Residential or Commercial Inspections.  Visit www.guaranteedresidentialinspections.com for more information. As a Certified Building Code Official with over 4,000 inspections your investment will be in good hands.  Experience and knowledge can help protect your investment.

DUAL PANE WINDOW GLASS REPAIR

DUAL PANE WINDOW GLASS REPAIR. For the past few weeks, I have been explaining how to repair a broken window pane in your home. But, what if you have dual pane windows? Is the process the same? Well, pretty much, except for a couple of variations. So, let’s review the single pane repair process, and I will point out the differences regarding dual pane windows.

When we start talking about dual pane windows, one of the first things that comes to mind is vinyl window frames instead of aluminum. When dealing with dual pane windows, you can have either aluminum or vinyl frames, depending on the year the house was built. Dual pane glass got popular in the 1980′s, but vinyl frames didn’t really catch on until the 1990′s. So, if your house is less than 10 years old, chances are you have vinyl framed windows. In either case, I will discuss the differences. Let’s say you have a sliding aluminum frame window with dual pane glass. The procedure for removing the frame from the opening and the glass from the sash is the same as with the single pane windows. The differences are, first, the glass goes into the frame about twice as far as the single pane window. The single pane window glass went 1/4″ into the surrounding rubber. The dual pane usually goes 1/2″ into the rubber. So, if both pieces of glass have been broken, you are going to have to order a new IGU (Insulated Glass Unit) from the local glass shop. They are going to want to know the width, height, overall thickness, and possibly the individual glass thickness. The best way to get the dimensions is to measure the width and height from rubber to rubber, write those numbers down. Then, remove the panel from the opening and place it on a table like we did with the single pane window. Remove the screws from opposite corners and pull of the frame. You will be able to see how far the glass goes into the surrounding rubber. If it’s 1/2″, then you want to add 1″ to the width and height that you measured previously (1/2″ times two sides= 1″). Then, measure the overall thickness of the unit by removing the rubber from the glass edge. Typically, this dimension is 1/2″, but not always. There is a metal spacer that divides the two panes of glass. Make a note of the color so you can request the same color in the new IGU. It’s either going to be silver or bronze. If you want to get the same size spacer, you need to give the glass shop the thickness of each piece of glass in the IGU. If the old unit has 1/8″ glass on both sides, and the overall thickness of the unit is 1/2″, then they will use a 1/4″ spacer. If the glass is 3/32″ on both sides, they will use a 5/16″ spacer. If you don’t care about matching the spacer thickness, you can request the thicker 1/8″ glass, and they will automatically use a 1/4″ spacer.

When you get the new IGU home, the installation is the same as the single pane window. Now, what if only one side of the IGU has been broken? Many times the outer pane will break, but the inside pane is fine. You can order a whole new IGU like we just did, or, if you’re the adventurous type, you can order only the single pane of glass that was broken and replace it. I’m going to explain how to do it, then i’m going to tell you the things that can go wrong. After you have the window pane on the table with the surrounding frame removed, you will see a black rubber type substance around the edge where the spacer is applied. This is a butyl sealant, and you have to separate the broken glass from this butyl. The best way to do it is to take a utility knife with a new blade and break through the butyl where it meets the broken glass. Then, take a new hacksaw blade, and push it into the area where you sparated the butyl from the glass. You don’t want the hacksaw blade to be attached to a hacksaw. Using your hand, saw back and forth as you work your way around the edge of the glass. This should allow you to remove the glass. Once that’s done, lay rags on top of the good piece of glass to catch any debris, and scrape the surface of the spacer that will be contacting the new glass. Use a putty knife. Then, remove the rags and debris. When you are ready to put the new glass on, clean the inside of the good piece of glass that you didn’t remove. Remember, once you install the new glass, any debris or finger marks on the inside will be permanently sealed. So, clean it real good and check it from all angles. Do the same to the side of the new glass that will be going to the inside of the IGU. Then, run a thin bead of clear silicone around the entire perimeter of the spacer. Set your new glass on the spacer and use finger pressure to adhere the glass to the silicone all the way around.Then, come in from the side, and run silicone around the side where the glass and spacer meet. Cover the window opening with something for 24 hours. You do not want to touch the IGU for 24 hours. The silicone needs to cure. After 24 hours, you can assemble the unit and install it back into the opening.

There are a couple of things that can go wrong. The first one is leaving marks on the inside portion of the glass. Once you seal the glass, you cannot clean what’s between the panes. The other thing involves condensation between the panes. If you have even the slightest break in the silicone seal around the glass, chances are you will begin to see moisture form as soon as the nights get cold and the days get warm. You are going to have to decide if you are confident enough in your ability to do the job right, or if it’s better to pay the extra money to have it done for you. Just because you pay someone to do it, doesn’t mean you still won’t encounter the same problems. The difference is, they have to guarantee their IGU for a minimum of 1 year. I have received many units over the years that had marks in between the glass. The beauty of it is the manufacturer can’t dispute it, because there’s no way anyone else could have done it except them.

OK, what if the window frames are vinyl instead of aluminum? Well, the main difference is the glass in a vinyl window no longer has the rubber gasket around the edge. You don’t remove the opposite corner screws and separate the frame from the glass. What they do is put either silicone or a two sided tape on the lip of the frame where the glass rests. That’s what holds the glass in the frame, then they apply a snap in stop on all four sides of the glass. So, you have to remove the stops first, then turn over the panel and break the seal holding the glass to the frame using a utility knife. Wear gloves during this procedure. If only one side of the IGU is broken, don’t even think about repairing just the one side. You will never get that IGU out of the frame without breaking the other piece of glass in the process. But, on the positive side, you can remove the stops without taking the panel out if it’s a slider. You can then measure the dimensions of the glass, and order the new IGU. That way you eliminate any need to temporarily cover up your window. The same is true for the stationary portion of a slider, or a picture window. Before you install the new IGU, be sure and clean the lip that had the tape or silicone, and apply either silicone or tape. Either will work.

You will discover that replacing an IGU in an aluminum frame window is a whole lot easier than a vinyl window. But, in either case, you can do it yourself and save a few bucks.

Repairing Rotting Wood Tips and Techniques

Causes of Rotting Wood

Whenever wood has more than 20% moisture exposure it has the potential to deteriorate. It’s very important to keep up on caulking and painting with quality materials to prevent wood rot.

If you are at the point where you already have wood rot we recommend you do not use pine for rot replacement. Pine available on the market today tends to be new growth pine. Pine available today is not as dense as older growth pine and will rot in a very short period of time. So many home owners are so disappointed to find their new homes have extensive wood rot damage within the first five years.
window rot by Barrie Home Inspector

Painting and caulking are two of the home owners best materials that will help prevent wood rot. Caulking is one of the best defenses your home has against moisture. Home owners should be vigilante for the appearance of peeling or cracking paint and cracked or missing caulking. Either of these are indicators that your wood is now being attacked by moisture. As a home inspector I am always reminding my clients of the old but true adage that ” an ounce of prevention is better than a pound of cure.”


Repairing Areas of Wood Rot

Using a wood chisel, an electric drill with a spade bit, or another tool appropriate for the location to remove all of the wet, loose and decayed wood.
Probe the surrounding area with an awl. If it feels as solid as unaffected areas, drill numerous closely spaced holes of 1/8-inch (3-mm) diameter in the wood and inject a liquid wood hardener following the manufactures directions.

Mix two-part epoxy or polyester wood filler as directed. Mix only what you can apply and shape in a few minutes. Once the material hardens it is un-workable and must be thrown away.

Fill the hole or build up the affected area with the wood filler, using a putty knife or flexible plastic spreader. Press hard on knife to work the initial layer into the surface for a good bond.

Clean off the applicator and mixing container immediately

Use a rasp tool to roughly shape or level excess filler as soon as the filler sets up, but before it dries completely.
Use medium or coarse sandpaper to further shape and blend the patch when the filler is completely dry. On flat surfaces, use a rubber sanding block or power sander. On contoured surfaces, use wood dowels or other appropriate shapes to back the sandpaper.

Blow off the dust and apply freshly mixed filler to fill any remaining depressions or pinholes, or to build up more material as needed to attain the desired shape.

Use medium, then fine sandpaper to smooth the patch and feather it into the surrounding wood.

After completely dry prime and paint to suit.

Choosing Your Exterior Paints

For most exterior wood in reasonably good shape, pick a high-quality acrylic primer. It remains elastic and permeable so moisture can “breathe” through the paint skin. This will decrease the chance of the paint bubbling and peeling due to moisture in the walls.

Consider oil- or shellac-based primers for cedar or redwood. With these, you have to factor in problems with tannin staining. Tannin is a natural substance in the wood which will bleed through and cause yellow or brown stains in your finished paint job. It is water soluble, so it will bleed through any water based product. Oil and shellac primers will stop tannin from bleeding through. Some water-based primers claim to be able to stop tannin staining, although sometimes two or more coats will be necessary. Use your own judgment.

Ask at your paint store about breathable oil primers, which are formulated to allow passage of moisture from the house through the paint. (All water-based products, unless they are sold specifically as moisture-barriers, are breathable.) Breathable oil primers would be your best choice to help combat tannin staining some plywood materials, in addition to cedar, redwood.

Use oil-based primers for very punky, soft older wood. Oil-based primers penetrate much deeper into the wood fibers and create a more solid substrate to paint over.

This article is brought to you by Roger Frost, The Barrie Home Inspector, browse our Home Maintenance Tips Blog for more Money Saving Tips

Moisture and Your Home’s Bricks

Moisture and Your Home’s Bricks.   Moisture can do a great amount of damage to your home.  This is especially true when you live in a climate where freezing occurs.  Water turns to ice which expands when frozen and this can cause quite a lot of damage to your bricks and concrete products in your home.

Bricks for building may be made from clay, shale, soft slate, calcium silicate, concrete, or shaped from quarried stone. However, true bricks are ceramic, and therefore created by the action of heat and cooling.
Clay is the most common material, with modern clay bricks formed in one of three processes – soft mud, dry press, or extruded.

As a Professional Home Inspector I come across many brick homes where the brick weeping holes have been filled, commonly with spray foam, this is not permitted as the weeping holes are very important to the maintenance of brick.  This weep holes should be spaced 600 mm apart or 24 inches.  Plastic or metal preformed weep holes can be utilized to keep our insects etc.

Poor workmanship is one of the main causes of brick failure.  Poor mortar mixing, allowing mortar to dry out, poor storage of masonry units, and unbonded mortar on joints all lead to potential for mortar cracking and the intrusion of moisture which causes deterioration and spalling.  The proper application of mortar will affect how well the bricks will repel rain and other moisture issues.

Brick walls are never waterproof. Bricks and mortar are able to absorb a great deal of moisture in multiple ways and must be able to breathe to eliminate this moisture. Sealing weeping holes eliminates the drainage of the space behind bricks which also allows for air movement in cavity.  Solar heat will drive moisture on surface of bricks through into the cavity adding to moisture content.

There are two common types of window sills, brick and concrete sills.  Both of these sills are susceptible to moisture damage in winter climates.  Any small crack or failure for mortar to bond to bricks provides an entry point for moisture.  The freezing cycle will continue to expand these tiny cracks until brick damage occurs.

The Barrie Home Inspector routinely comes across this problem at the early stages of mortar cracking and routinely points out to his clients the benefits of maintenance in preventing more severe damage.  The old adage of “an ounce of prevention is better than a pound of cure” is especially true in the maintenance of your brick window sills.

Home Inspection and Drywall Basics

Home Inspection and Drywall Basics.  One of the most common deficiencies found during a home inspection is cracks in drywall or plaster. Cracks are common in plaster and drywall because they are brittle and rigid but are supported by materials that are not equally as rigid. Plaster and drywall are attached to flexible wood structures on foundations that rest upon compressible soil. Wood expands in humid weather and contracts in dry weather. Plaster and drywall are too rigid to move with the wood and therefore cracks will appear when there is any movement in the house or foundation.

Drywall installation involves nailing or screwing the sheets to the studs. Drywall installers cut the sheets to fit, and holes must be cut to accommodate pipes and mechanical equipment. The sheets are then fastened to the studs in a process called hanging. While most drywall installation used to use nails, screws are now the most common. Drywall is normally installed perpendicular to (across) the ceiling joists and wall studs, and the ceiling is always installed first.

Special moisture resistant drywall is used where excessive moisture may be a problem, such as bathrooms. In most cases, the moisture resistant drywall is green. Fire-rated drywall (Type X) is used where building codes require it. Typically in garages and under stairs.

After the drywall is installed, special metal corner strips (“corner bead”) is installed on all corners. This helps to protect the edges of the drywall and provide a nice straight finished edge. Joint compound (drywall mud) is used to finish all joints, nail heads and corners. In most cases, two or three coats of compound are needed at all taped joints. The texture coat is applied last.

The finished quality of your drywall will have a large impact on the beauty of your home. Most drywall cracks can be eliminated by just applying joint compound, but plaster cracks should be widened to 3/8 inch down to the lathe cleaning it out and wetting it with Elmer’s glue diluted 50% with water. If sections of plaster are disconnected from the lathe, they can be secured with “plaster buttons” prior to plastering the crack. Press fresh patching plaster, not joint compound, into the crack so that it is forced into the spaces between the lathes.
When plaster ceilings are full of cracks, apply drywall directly over the plaster and don’t bother patching. It’s just not worth the effort. Make sure the drywall is screwed to the floor joist or strapping and not just to the lathe.

Buildings built between 1930 and 1950 may have metal lathes under the plaster. You’ll notice when you try to hang a picture! You can distinguish between metal or wood lathe by hitting the wall. Metal lathe walls tend to be much stiffer.

This home maintenance tip and maintenance advice is brought to you by the Barrie Home Inspector and Orillia Home Inspector

Inspecting Your Home for Moisture

Moisture and water vapor move in and out of a house in three ways: with air currents; by diffusion through materials; and by heat transfer. Of these three, air movement accounts for more than 98% of all water vapor movement in building cavities. Air naturally moves from a high-pressure area to a lower one by the easiest path possible-generally, through any available hole or crack in the building envelope. Moisture transfer by aircurrents is very fast-in the range of several hundred cubic feet of air per minute.Thus, to control air movement, a house should have any unintended air paths thoroughly and permanently sealed.

The laws of physics govern how moist air reacts within various temperature conditions. The study of the properties of moist air is technically referred to as “psychrometrics.” A psychrometric chart is used by professionals to determine at what temperature and moisture concentration water vapor begins to condense. This is called the “dew point.” By learning how to determine the dew point, you will better understand how to diagnose moisture problems in a house.Ventilating roofs in hot and humid conditions may add (rather than remove) moisture from attics and enclosed roof spaces. However, not ventilating roofs may void the asphalt-composition roofing manufacturer’s warranty, and slightly decrease the life expectancy of the roofing material due to increased temperature of the roof’s surface.

Recommended minimum widths for roof overhangs for one- and two-story wood-frame buildings are typically 12to 24 inches. For taller structures, larger roof overhangs are desirable. Alternatively, porch roofs and upperfloor overhangs can be used to protect lower-story walls.
Some jurisdictions do not regulate roof overhangs. Common problems with guttering are associated with installation and maintenance. Home inspectors can check ifproperly sized materials are being used, if guttering is appropriately sloped toward adequately sized downspouts,and if discharge is directed away from the building’s perimeter. Discharging water at inside building cornersshould be avoided. Some local storm water requirements may require special infiltration or filtration treatmentsof roof runoff.

The installation of even the most weather-resistant wall envelope system on a house does not diminish the need or proper installation, particularly with regard to flashing details at penetrations. In addition, the use of roof overhangs provides performance benefits for all cladding systems by reducing the moisture load experienced over time, and by allowing greater opportunities for walls to dry in the event of periodic wetting due to wind-driven rain. The life expectancy of various siding materials may vary widely, from 10 to as much as 100 years or more, depending on type of material, climate exposure, maintenance, and other factors.

water in basement by barrie home inspector

Face-Sealed: This type of WRE relies exclusively on the ability of the outer surface of the wall and joints around penetrations to deflect water and prevent it from penetrating the wall surface. If a defect in     the wall surface or joint detailing (such as caulk) exists or occurs over time, then water will penetrate and potentially accumulate in the wall, causing damage to any moisture-sensitive materials within the   assembly. One example of this type of system is known as conventional or barrier EIFS (exterior insulation finish system). However, building standards only allow the use of a new type of drainable EIFS      (i.e., drained cavity) on residential construction.

Assessing your buildings exposure can determine the amount of protection required. The terrain surrounding a building impacts its exposure to wind-driven rain. The ratio of roof overhang width to the   height of the protected wall below also alters the exposure of a building to weather and wind-driven rain. Long roof overhangs relative towall height effectively reduce the exposure. Similarly, increased shielding of the site against wind tends to reduce the effects of climate. Understanding the exposure in this manner can guide inspections of flashing details, the potential benefits of having greater overhangs installed, etc.

Many performance problems with windows and doors are related to installation issues. Installation directionsincluded with window and door units should be followed carefully. Home inspectors are not required to confirm compliance with a manufacturer’s recommendations. However, knowing the general guidelines and techniques for proper installation of windows and doors will assist the inspector in recognizing installation problems that may promote moisture intrusion.

Having your home inspected by a Certified Building Code Official will identify most common moisture issues and the Barrie Home Inspector is available to help identify and correct moisture issues in your home.

Masonry Brick and Moisture – Weather Proofing Techniques

Masonry Brick and Moisture – Weather Proofing Techniques

The enduring strength, beauty and performance of a brick wall assembly is critically dependent on three components: design, workmanship and materials. If even one of these factors has not been diligently applied, integrity of the wall assembly is compromised.
The single most important factor to be understood and designed for in the Canadian climate is moisture control. Seldom does failure of a brick wall assembly occur without the presence of an excessive moisture load. Excessive is defined as being more moisture than can dry out of the assembly before that assembly freezes due to ambient temperature conditions. The trapped moisture will freeze and thaw and may cause deterioration known as spalling, in which part of the brick surface may break away.

Examples of Extra Severe Weathering Conditions:
Houses and buildings built within the spray zone of lakes
Buildings constructed in open areas with little or no protection from the wind by other buildings or trees
Upper floors of high rise buildings
It should be noted that certain parts of masonry structures are more vulnerable to the weather than others. These include parapet walls surmounting multi-storey buildings, freestanding walls, chimneys and walls put in contact with the garden grade level. In these adverse conditions, it is even more critical to ensure the correct use of materials, details and workmanship.

Chimney Cap Construction DetailsChimney Construction

Chimneys
The two most critical components of chimney construction are workmanship and a proper chimney cap. (See Fig. A for proper chimney cap details.)
Ensure that the chimney cap installed has an overhang of no less than 50mm (2″), and a drip groove (as shown in Fig. A) to shed water past the plane of the four chimney walls. Ensure that all joints are properly caulked.

Note: The through wall flashing detail shown in Fig. A applies to all masonry walls which traverse the roof line. i.e. where an exterior wall (or chimney) above the roofline is supported below the roofline by masonry, through wall flashing must be installed at the roofline to direct <a href=”http://www.napoleon.cc/cottage/”target=”_blank”rel=”external”title=”Midland Cottage Inspections” >water to the exterior.

Stone Sill Construction DetailProper Window Sill Construction

Window Sills
Important details for window sills:

Minimize the number of joints
Ensure minimum slope of 15″ to sill
Provide drip groove
Provide adequate flashing including end dams
Caulk all joints
The most fail-safe detail is to choose a stone, concrete or metal sill material that is tailored to the window opening and has a slope on top and a drip groove/lip on the under side. (See Fig. B)

Brick At Grade, Base Flashing and WeepholesMasonry Brick At Grade

Brick at Grade
Brick built on grade can result in the ingress of moisture, either from direct water run-off or the build-up of snow. Excess moisture present in the brick during the freeze-thaw cycles can result in spalling of the brick. The Ontario Building Code and good building practice dictate that brickwork should be a minimum of 150mm (6″) above grade. This requirement also applies to any level surface such as paving, patio deck or balcony. Furthermore, the ground should be contoured so that the water drains away from the wall. (See Fig. C)

Base flashing should be installed below the bottom course of masonry to prevent the upward migration of moisture due to capillary action (rising damp).

Always slope the grade away from the building. The masonry wall assembly should begin no less than 150mm (6″) above the grade line.
Grade should be measured from the top of the finished surface. This means that grade should be considered to be the top of a wooden deck, a stair tread, a poured concrete balcony, or any sort of finished surface, be it paving brick, gravel, asphalt, or the earth in a planting bed.

Weep holes – Brick Veneer Walls
Brick veneer walls, if correctly installed, provide the best protection from rain penetration. However, often critical details are omitted, causing the wall to become ineffective and water to penetrate past the wall. Two of the details often omitted are weep holes and flashing. (See Fig. C)

This detail should be at the base of all brick veneer walls, on top of windows, doors and other openings into brick veneer walls.

Coping To Freestanding WallsCoping To Freestanding Walls

Parapet Walls and Columns
The top of parapet walls, freestanding walls and columns are subjected to the same severe weathering as chimneys. Hence, they also require special attention to details. Figure D shows a typical cap for a wall or column. A stone or pre-cast concrete cap with an overhang and drip groove is recommended.

Roof Overhang by the Barrie Home InspectorThe minimum overhang should be 50mm (2″) with the placement of the drip groove 25mm (1″) from the masonry wall.

Planters and Retaining Walls
Brick walls used to retain soil, in planters, or other applications will be subjected to moisture ingress from the soil. The brick wall should be constructed with a concrete block backup wall with a cavity (airspace), base flashing and weep holes to permit moisture to drain away from the masonry. The interior side of the concrete block backup should be coated with a waterproof material to prevent moisture transmission through the wall. (See overleaf Fig. E)

Drainage should be provided at the base of the planter box to prevent the build up of hydrostatic pressure.

Research shows that even a modest roof overhang significantly reduces the amount of water reaching the wall.

Eaves troughs (gutters) and down pipes should be correctly sized and positioned to remove rainwater without undue overflow onto the walls.

WP-WallCaulking and Sealants
Caulking of joints is critical to prevent the ingress of moisture. However, with time and weathering, caulking materials will deteriorate and become ineffective. Caulking materials should be inspected regularly and replaced when necessary.

Water Repellent & Colourless Coatings
The Brick Institute of America (BIA) warns that in climates that experience freeze-thaw cycling, colourless coatings may adversely affect the durability of brick masonry by inhibiting moisture evaporation. The use of masonry water repellents is suggested sometimes as a possible solution to leaky walls. Before these products are considered, construction details need to be checked for integrity. Items contributing to leakage include ineffective flashing at the base of the wall, absence of a clear cavity and weep holes, unfilled head joints or cracks at the mortar/brick interface. Air leakage from the interior can be a major cause of moisture on the inside of the brick veneer.

Gas Furnace Outlet
The vents from gas furnaces and other appliances should be directed to discharge moisten laden air away from the masonry.

Workmanship
Beside the use of correct materials and proper design details, good workmanship is required to ensure successful performance of masonry.

Joint Profiles
The tooling and profile of a mortar joint has significant effect on the ability of the masonry to resist moisture penetration. Different joint profiles are shown in Fig. G.

Raked joints are popular because they accentuate the aesthetics of the brick. However, they are not recommended for exterior masonry work in the Canadian climate. Raked joints provide a ledge for moisture ingress and retention.

Concave tooled joints are recommended for all exterior masonry. Joints should be tooled when the mortar is thumb print hard. The jointing tool should be larger than the joint width; i.e. use a 12mm diameter tool for a 10mm joint width. The tooling process smoothes and compresses the joint to promote superior water repellency.

Summary
If moisture entry and retention in the brickwork is avoided by the application of well considered design, quality workmanship and the correct choice of component materials, the enduring strength, beauty and performance of your masonry wall assembly should always be a source of pride to you.

Please consider the information listed in these technical notes as advisory highlights only. There are certainly many more conditions to be considered in the design and construction of a masonry wall assembly in a severe weather climate zone such as the Great Lakes region. Those considerations are best left to your design and construction professionals.

REFERENCES:
Building for the Future: A Guide to Masonry Construction prepared by the National Association of Brick Distributors, Ontario Chapter 1993
BIA Technical Note on Brick Water Resistance Construction, Series 6A, 7, 7A, 7B, 7C, 7D, 7E
Brick Institute of America, Reston, Virginia

Fig. A
Chimney Cap Construction Details
Click here for Proper Chimney Construction

Fig. B
Stone Sill Construction Detail

Fig. C
Brick At Grade, Base Flashing and Weepholes

Fig. D
Coping To Freestanding Walls

Fig. E
Roof Overhang

Fig. F
Planter and Retaining Walls

Fig. G
Mortar Joint Profiles
Different Materials to Use for Basement Flooring

Different Materials to Use for Basement Flooring.  Basement flooring is obviously the foundation of the process of remodeling your basement. If basement flooring is not done right, you are just going to waste money and effort in trying to make your whole basement look good. The great thing is that there are several options on how you can have a beautiful, worth it flooring.

Water is Enemy

Water in whatever form – be it from underground moisture or drainage issues – is a bane to basements. Before doing any remodeling, have your basement drainage system checked thoroughly and fixed by a plumber. You’d not want it to have a well created basement only to understand that water starts to creep in. Sometimes water slippage can come from the exterior drainage outside the house.

Due to the damp nature of most basements, moisture is really a usual headache. Moisture can cause stains to tile floor, mildews and molds to carpet floor and damage to plywood and hardwood floor. At any rate, moisture can weaken the bond of the adhesive utilized to stick whatever flooring material you’ve. Thus, prior to totally performing any remodeling, do precautionary tests on the wetness of the floor.

Test the Floor

One way to test the wetness or the moisture level of the floor is to use a waterproof material that is about 4 inches-by-4 inches in size. Place flat the waterproof material, preferably the type of flooring that you have in mind to use, on the basement floor. Seal it in such a way that no air gets in. Put it in several corners of the floor walls and one in the center area of the floor. Leave it for at least a day and then check if there is any moisture coming in.

If you notice any type of moisture, then you need to figure out and fix the floor issue first before proceeding with remodeling. It also means that your floor is naturally damp. At this point, it is ideal if you ask the opinion and suggestion of a basement flooring expert. You can probably make do by changing the type of flooring material to be utilized or install a vapor barrier.

Flooring Materials

There is no such thing as perfect flooring material. It is always a case-to-case basis. It also depends on the desired look and really feel that you want for your basement. Whilst that being stated, here are some typical flooring options and their usual attributes:

1. Wooden Subfloor – It’s inexpensive but is prone to rotting when there’s no vaporizing barrier installed.

2. Carpet – It’s extremely easy to install but is prone to mildew and molds.

3. Painting the Subfloor – You can do it your self in the event you know how you can paint walls. But you may need to keep re-painting after a couple of months.

4. Stained Basement Floor – This gives you room to be very creative with several styles and colors obtainable. But you may have to invest a bit much more compared to, say, using a wooden material.

5. Tiled Floor – This also allows you much more room for creativity and is a viable option for wet basements. But this material would not help a lot in lessening the coldness of the floor so you may need to use rugs.

Another essential consideration with regards to basement flooring is if who’s performing the flooring function: you or a hired expert? If it’s you, keep in mind that tiles and stained basement floor might take more effort to haul and install. The latter supplies also need specialized skills and equipments.

Find out more about basement finishing system. Explore more online sources on basement finishing systems.

Posts Related to Different Materials to Use for Basement Flooring

  • When Is The Best Time To Choose Engineered Hardwood Flooring?

    Engineered flooring looks a lot like a solid hardwood floor, but something is different below the surface. Made up of three to seven cross stacked …

  • Hardwood Flooring – Maintenance and Care

    Hardwood Flooring – Maintenance  and Care Hardwood is one of the best choices when it comes to flooring options. Hardwood floors are preferred over carpet …

  • CMHC Basement Renovation Guide

    Remodelling your basement is one of the easiest and most cost-efficient ways of adding new living space to your house. Besides the traditional recreation room, …

  • Fix Your Damp Basements

    A wet basement can be obvious – water trickling across the floor or standing several inches deep at the base of the stairs. But there …

  • Water Problems and Solutions for Home Owners

    Most water problems that homeowners encounter can usually be by controlling water above ground. Simple but effective means of controlling those above-ground problems may prevent …

Barrie Home Inspector © 2013 Frontier Theme