Barrie Home Inspector

Home Maintenance and Tips for Home Owners

Category: Home Inspection

Home Inspection Tips for buyers and sellers.

Buying Older or Century Homes

Buying Older or Century Homes.  When buying an older home you are usually buying a home with built in character which has withstood the test of time and is still in habitable condition.  There are some inherent problems that you might encounter when purchasing an older home.  I have listed a few basic ones just for consideration.

Rock and Cement FoundationYour older homes foundation is probably constructed of cement and stone.  There would have been no waterproofing done to the exterior of the foundation and there will be no weeping tile draining into sump.  This inspection area is one of the most important and expensive to repair if faulty.

Knob and tube wiring was usually installed in all older homes and there is usually still porcelain insulators present even if it was all removed.  You have to have a home inspector or electrician check to ensure all the knob and tube wiring was replaced.  The knob and tube was usually replaced with older two wire which has no ground and unless a total rehab was done on building you will still find two wire at outlets on upper floors and other hard to access areas.

Asbestos and vermiculite can be found in many older homes.  Some older homes had hot water boilers with cast iron radiators.  This systems were typically insulated with asbestos insulation.  Vermiculite insulation may contain asbestos and was frequently added to attics in older homes.  Asbestos requires professional removal which is very expensive.

Lead plumbing pipes and galvanized plumbing lines can be very expensive to replace and were used on most older homes.  Most insurance companies in Ontario will not insure a home with galvanized plumbing pipes.  Galvanized pipes tend to corrode from the inside out so that there is no warning that a pipe is about to burst.

Older homes may have many layers of lead paint which has built up over the years.  Lead-based paint is a major source of lead poisoning for children and can also affect adults. In children, lead poisoning can cause irreversible brain damage and can impair mental functioning. It can retard mental and physical development and reduce attention span. It can also retard fetal development even at extremely low levels of lead.  Thus, young children, fetuses, infants, and adults with high blood pressure are the most vulnerable to the effects of lead.

Cast Iron RadiatorsYour house is old and gorgeous, as are those wonderfully ornate cast-iron radiators, but these days, energy prices are anything but old-fashioned. Older homes have radiators sized for a time when open-window ventilation was popular and insulation was uncommon. If you’ve insulated and updated your windows, your radiators are most likely larger than they need to be.  You should have your home assessed by a heating expert to evaluate the expense and available options if required to upgrade your heating system.  Many people are using GEOthermal heat pump systems when they are in the country and have no real alternative fuel source.  Oil and propane are available for people who have no access to natural gas but can be very expensive,  especially in older homes that may be lacking in  insulation and thermal protection.
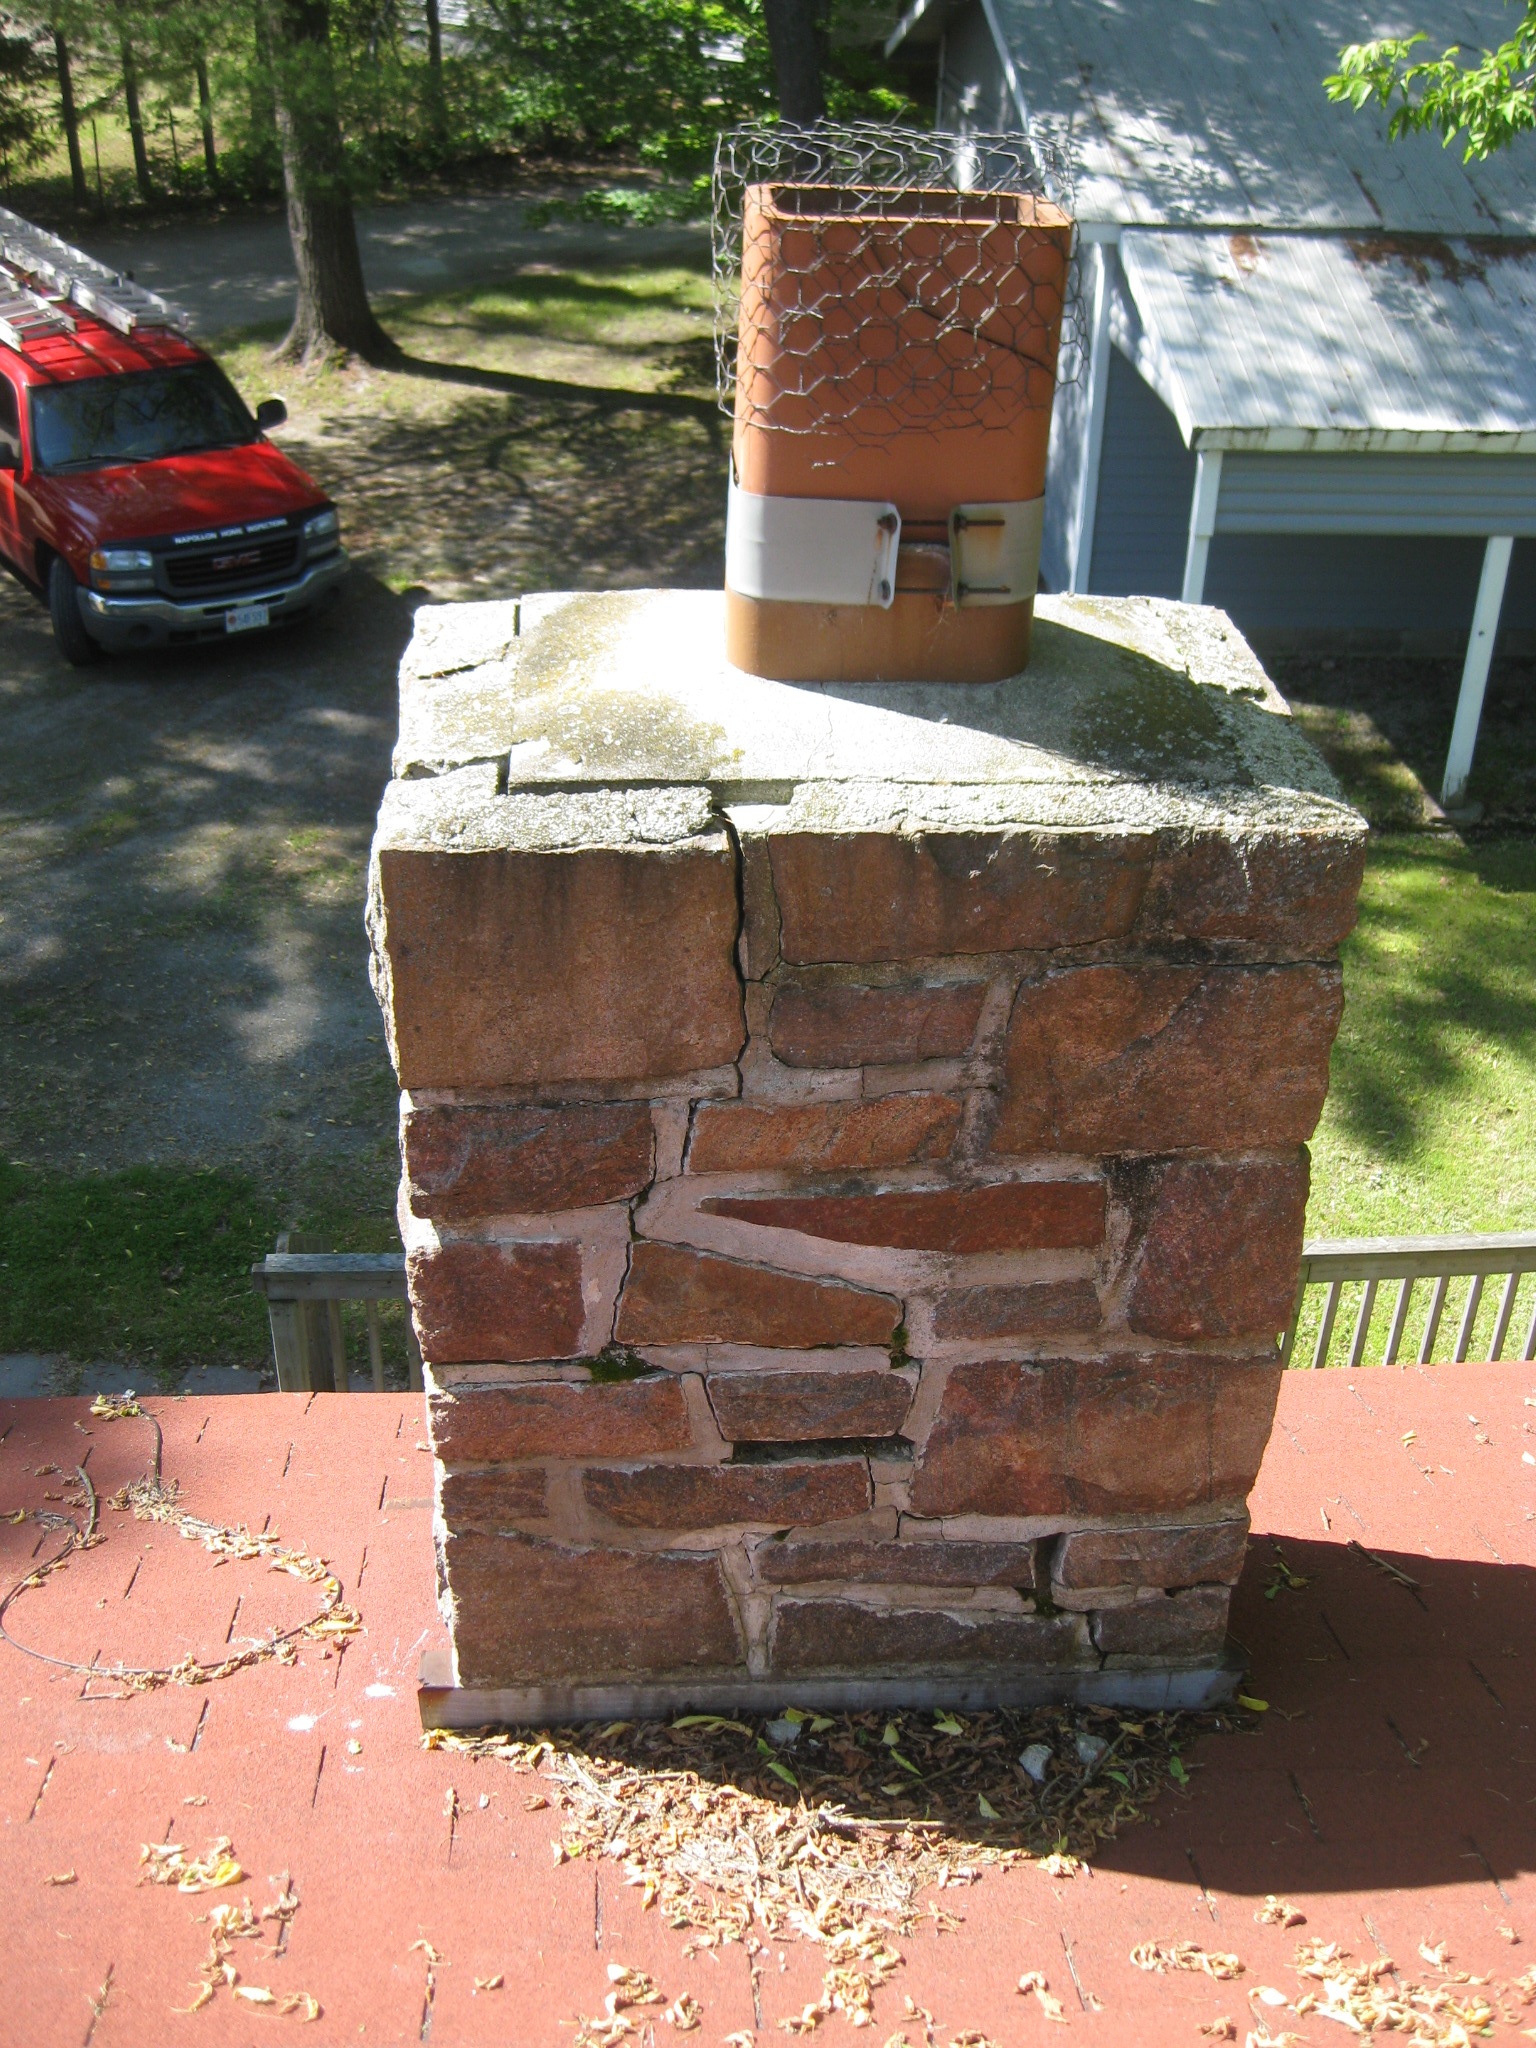
Many older homes with boilers also had asbestos insulation on both the boiler and the piping.  Even boilers which may have fiberglass insulation on pipes may still have asbestos on elbow joints.  Ensure your potential home is asbestos free prior to purchasing.  Depending on the amount of asbestos in the home the cost of removal can be disastrous to your renovation budget.


The Barrie Home Inspector has many years of experience in inspecting Century Homes and is also a Certified Building Code Official with the Ontario Building Officials Association.  Commercial Building inspections also entail the same problems as residential and buyers have to be aware of the risks and hazards involved in purchasing older properties.  Visit the Barrie Home Inspector’s site a www.barriehomeinspector.com to obtain more information and advice when dealing with older homes.

Barrie WETT Inspection

Barrie WETT Inspection. Most people love the idea of having a natural wood burning fireplace in their home, but they sometimes do not realize all of the responsibilities that come with it. Fireplaces do take a bit of care to ensure that they do not cause any problems. Just one little issue with a fireplace could result in your house catching fire, so having a regular WETT inspection by a trained professional is very important. WETT inspections are performed for a variety of reasons, including insurance company requests, code compliance, and inspection after and overheat or chimney fire.

Most Insurance Company’s require a WETT Inspection anytime a Wood Burning appliance is installed or when buying a new home. There are strict requirements that affect clearances that many older stoves and fireplaces will not meet.

There are several things inspectors will look at when they perform a WETT inspection. Unsafe Chimney & Flue Items such as the chimney, the liner, the smoke chamber, damper, firebox and other working parts inside the fireplace or woodstove to make sure that they are working properly. The inspector will also make sure clearances to combustible materials are sufficient so you can use your wood burning appliance safely.

Complete inspection of any wood burning appliance involves an evaluation of every part of the heating system, from the floor pad to the chimney cap. All of these parts are covered in the codes, so compliance can only be determined if every part is inspected.

The chimney is usually the most difficult part of the system to inspect properly. Flue liners are subject to cracking inside masonry chimneys, or buckling and corrosion in the case of metal chimneys. It is difficult to inspect a chimney liner unless it has just been cleaned.

Inspectors only become certified after at least 80 weeks of work in the field and require a WETT Certified Certificateletter of reference. WETT Certified Inspectors must take and pass a two day Code Compliant course with a passing grade of 70 percent. WETT Inspectors then have the choice of becoming a certified tech or advisor, earn their certification in chimney sweeping, or earn a WETT certification in SITE basic.

In many cases, insurance companies will require you to have your units WETT certified, although this is a bit of a technical problem because of how the process works. WETT inspectors do not certify appliances, although they do provide certified inspections for the insurance company to show that all parts of the fireplace are in good working order.

The Barrie WETT Inspector will include a WETT Inspection of one appliance for $50.00 when included as part of Home Inspection package.  We also provide Alliston WETT Inspection services to the Town of Alliston and New Tecumseth.   We have been WETT Certified for over 10 years and have a wealth of knowledge concerning Wood Stoves, Pellet Stoves and Fireplaces.

What is Radon – Is It in Your Home

What is Radon –  Is It in Your Home
Radon is a gas produced by the radioactive decay of the element radium. Radioactive decay is a natural, spontaneous process in which an atom of one element decays or breaks down to form another element by losing atomic particles (protons, neutrons or electrons). When solid radium decays to form radon gas, it loses two protons and two neutrons. These two protons and two neutrons are called an alpha particle, which is a type of radiation. The elements that produce radiation are referred to as radioactive. Radon itself is radioactive because it also decays, losing an alpha particle and forming the element polonium
Elements that are naturally radioactive include uranium, thorium, carbon and potassium, as well as radon and radium. Uranium is the first element in a long chain of decay that produces radium and radon. Uranium is referred to as the “parent” element, and radium and radon are called “daughters” or “progeny.” Radium and radon also form daughter elements as they decay. The progeny of radon are called radon decay products, or RDPs.

The decay of each radioactive element occurs at a very specific rate. How fast an element decays is measured in terms of the element’s “half-life,” or the amount of time for one-half of a given amount of the element to decay. Uranium has a half-life of 4.4 billion years, so a 4.4-billion-year-old rock has only half of the uranium with which it started. The half-life of radon is only 3.8 days.

If a jar were filled with radon, only half of the radon would be left after 3.8 days. But the newly-made daughter products of radon (or RDPs) would also be in the jar, including polonium, bismuth and lead. Polonium is also radioactive. It is this element which is produced by radon in the air and in people’s lungs that can hurt lung tissue and cause lung cancer.
Radioactivity is commonly measured in picocuries (pCi).

Because the level of radioactivity is directly related to the number and type of radioactive atoms present, radon and all other radioactive atoms are measured in picocuries. For instance, a house having 4 picocuries of radon per liter of air (4 pCi/L) has about eight or nine atoms of radon decaying every minute in every liter of air inside the house. A 1,000-square-foot house with 4 pCi/L of radon has nearly 2 million radon atoms decaying inside it every minute.

Radon levels in outdoor air, indoor air, soil air and groundwater can be very different. Outdoor air ranges from less than 0.1 pCi/L to about 30 pCi/L, but it probably averages about 0.2 pCi/L. Radon in indoor air ranges from less than 1 pCi/L to about 3,000 pCi/L, but it probably averages between 1 and 2 pCi/L. Radon in soil air (the air that occupies the pores in soil) ranges from 20 or 30 pCi/L to more than 100,000 pCi/L; most soils in the United States contain between 200 and 2,000 pCi of radon per liter of soil air. The amount of radon dissolved in groundwater ranges from about 100 to nearly 3 million pCi/L. Natural Radiation Exposure

Since the beginning of time, all living creatures have been exposed to radiation. We live in a radioactive world. There are many natural sources of radiation which have been present since the Earth was formed. In the last century, we have added somewhat to this natural background radiation with artificial sources. However, the naturally occurring sources contribute about four to five times more radiation than human-made sources.

The three major sources of naturally occurring radiation are:

• cosmic radiation;
• sources in the earth’s crust, also referred to as terrestrial radiation; and
• sources in the human body, also referred to as internal sources.

Cosmic

The Earth and all living things on it are constantly bombarded by radiation from space, similar to a steady drizzle of rain. Charged particles from the Sun and stars interact with Earth’s atmosphere and magnetic field to produce a shower of radiation, typically beta and gamma radiation. The dose from cosmic radiation varies in different parts of the world due to differences in elevation and to the effects of the Earth’s magnetic field. Cosmic radiation comes from the Sun and outer space, and consists of positively charged particles, as well as gamma radiation. At sea level, the average cosmic radiation dose is about 26 millirems (mrem) per year. At higher elevations, the amount of atmosphere shielding cosmic rays decreases and, thus, the dose increases. The average dose in the United States is approximately 28 mrem per year.

Terrestrial

Radioactive material is also found throughout nature. It is in the soil, water and vegetation. Low levels of uranium, thorium and their decay products are found everywhere. This is called terrestrial radiation. Some of these materials are ingested with food and water, while others, such as radon, are inhaled. The dose from terrestrial sources also varies in different parts of the world. Locations with higher concentrations of uranium and thorium in their soil have higher dose levels.

The major isotopes of concern for terrestrial radiation are uranium and its decay products, such as thorium, radium and radon.

There are natural sources of radiation in the ground, rocks, building materials and potable water supplies. Radon gas is a current health concern. This gas results from the decay of natural uranium in soil. Radon, which emits alpha radiation, rises from the soil under houses and can build up in homes, particularly well-insulated homes. In the United States, the average effective whole-body dose of radon is about 200 mrem per year, while the lungs receive approximately 2,000 mrem per year.

Internal

In addition to cosmic and terrestrial sources, all humans are born with naturally occurring radionuclides, such as Potassium-40, Carbon-14, Lead-210, and other isotopes. The variation in dose from one person to another is not as great as the variation in dose from cosmic and terrestrial sources. The average annual “dose” from internal radioactive material is about 40 mrem.

Ionizing Radiation Exposure to the Public

This chart shows that of the total dose of about 360 millirems per year, natural sources of radiation account for about 82% of all public exposure, while man-made sources account for the remaining 18%.

Government of Canada Radon Guideline
Did you know?
The Canadian guideline for radon is 200 becquerels per cubic meter, If the radon level is found to be high, it can be fixed.
Health Canada collaborated with the Federal Provincial Territorial Radiation Protection Committee (FPTRPC) to review the health risk from exposure to radon. The risk assessment is based on new scientific information and was the subject of broad public consultation. Using the risk assessment and feedback obtained from the public consultation, the Government of Canada is updating its guideline for exposure to radon in indoor air. This updated guideline provides advice that is more broadly applicable and more protective than the previous FPTRPC guideline.
The Minister recommends that
• Remedial measures should be undertaken in a dwelling whenever the average annual radon concentration exceeds 200 Bq/m³ in the normal occupancy area.
• The higher the radon concentration, the sooner remedial measures should be undertaken.
• When remedial action is taken, the radon level should be reduced to a value as low as practicable.
• The construction of new dwellings should employ techniques that will minimize radon entry and will facilitate post-construction radon removal, should this subsequently prove necessary.
• In addition to residential homes, the term “dwelling” in this guideline also applies to public buildings with a high occupancy rate by members of the public such as schools, hospitals, long-term care residences, and correctional facilities. The following settings are excluded from this guideline:
o Uranium mines, which are regulated by the Canadian Nuclear Safety Commission;
o Other mines (e.g., fluorspar mines), which are regulated by provincial mining authorities; and
o Other workplaces which would be addressed by existing guidelines for naturally occurring radioactive materials (NORM). Details are given in theCanadian Guidelines for Management of Naturally Occurring Radioactive Materials (NORM) and a copy may be viewed or downloaded.
• The “normal occupancy area” refers to any part of the dwelling where a person is likely to spend several hours (greater than four) per day. This would include a finished basement with a family room, guest room, office or work shop. It would also include a basement apartment. It would exclude an unfinished basement, a crawl space, or any area that is normally closed off and accessed infrequently, e.g., a storage area, cold room, furnace room, or laundry room.
• The aim is to remediate and reduce the radon concentration to less than 200 Bq/m³. If the radon concentration is found to be greater than 600 Bq/m³, the remedial actions are recommended to be completed in less than a year; between 200 Bq/m³ and 600 Bq/m³, the remedial actions should be completed in less than two years.
• “As low as practicable” refers to what can be achieved with conventional radon reduction methods in a cost-effective manner. This is consistent with the ALARA (As Low As Reasonably Achievable) principle, whereby reasonable efforts are made to maintain radiation exposures as low as possible, with social and economic factors taken into consideration. In most situations, a final level less than 200 Bq/m³ will be readily achievable. In a small number of cases, it may happen that the application of all reasonable remediation techniques will still leave a residual radon level greater than 200 Bq/m³. It is not the intention of this guideline to recommend excessive or unreasonable remediation costs in order to achieve a marginal increase in benefit. Such situations should be evaluated on a case-by-case basis.
• This Government of Canada guideline is based on the guidance approved by the FPTRPC. The guideline is based upon current scientific understanding. It will be reviewed and updated as appropriate. Further information on the Federal Provincial Territorial Radiation Protection Committee is available.
Brought to you by the Barrie Home Inspector – Your Radon Specialist for Barrie, Alliston, Orillia, Midland, Penetang, Bradford, Newmarket and Aurora

Radon–Characteristics

Radon-222:

•    is a gas;
•    is odorless;
•    is tasteless;
•    is invisible;
•    mixes with air;
•    is chemically inert (or non-reactive);
•    is found everywhere;
•    decays by alpha-particle emission; and
•    has a half-life of 3.8 days.

Radon Decay Products, or RDPs:

•    are solids, called daughters or progeny;
•    are chemically active;
•    are electrically charged;
•    can attach to air particles and cling to surfaces;
•    have a ratio of progeny-to-radon gas ranging from 0.3 to 0.7 ER (equilibrium ratio),
averaging 0.5 ER;
•    are short-lived (from 0.2 milliseconds to 26.8 minutes);
•    include Polonium-218, 214 and 210, which are alpha-particle emitters, and
these alpha-particle emissions can cause physical cellular damage, such as lung cancer.

Risk Assessment Facts

•    The EPA’s indoor radon program promotes voluntary public actions to reduce the risks from indoor radon.   The EPA and the U.S. Surgeon General recommend that people perform a simple home test using kits which are now widely available in stores.  If high levels of radon are confirmed, it is recommended that those high levels be mitigated or reduced using straightforward techniques.
•    The EPA recently completed an updated assessment of their estimates of lung cancer risks from indoor radon, based on the NAS’s 1999 report on radon titled “The Biological Effects of Ionizing Radiation (BEIR) VI.” This report is the most comprehensive review of scientific data gathered on radon, and builds on and updates their previous findings. The NAS concluded that homeowners should still test and, if necessary, mitigate their exposure to elevated radon levels in their homes.
•    Radon is a naturally occurring radioactive gas that is colorless, odorless and tasteless.  It’s naturally produced from the radioactive decay of uranium that’s present in soil, rock and groundwater. It emits ionizing radiation during its radioactive decay, changing into several radioactive isotopes known as radon decay products or RDPs.
•    Radon gets into the indoor air primarily from soil under building structures.  Radon is a known human lung carcinogen and is the largest source of radiation exposure and risk to the general public.  Most inhaled radon is rapidly exhaled, but the inhaled decay products readily deposit in the lung tissue where they irradiate sensitive cells in the airways, increasing the risk of lung cancer.
•    The NAS BEIR VI Report confirmed the EPA’s long-held position that radon is the second leading cause of lung cancer, and a serious public health problem. The NAS estimates that radon causes about 20,000 lung cancer deaths each year. The report found that even very small exposures to radon can result in lung cancer.  They concluded that no evidence exists that shows a threshold of exposure below which radon levels are harmless. The report also found that many smokers exposed to radon face a substantially greater risk of getting lung cancer compared to those who have never smoked. This is because of the synergistic relationship between radon and cigarette smoking.

Reversed Polarity – Home Inspection Findings

Reversed Polarity – Home Inspection Findings.   Electrical Reversed Polarity Issues:

Everything works just fine, however my home inspector informed me that some of my electrical outlets have reversed polarity and should be rewired. Why is polarity an issue?

Polarity can be confusing. Within 120-volt household circuits, if the polarity is correct, the black wire is the hot wire and the white wire is neutral wire (grounded conductor). If the polarity is reversed the white wire is hot and the black wire becomes the neutral.

Some appliances have only two prongs and no ground (U-shaped) prong. Polarized appliances have a wide (neutral) blade and a narrow (hot) blade. This configuration fits with (grounded) receptacles with the same configuration. Problems occur when do-it-yourself homeowners forget that the brass screws on an outlet are for hot (black) wires and the silver screws are for the white(neutral) wires and the green screw is for the (ground) green wire

Polarity Matters:

With some appliances polarity doesn’t matter as with a clock for example. However with a lamp socket the electricity is intended to flow from the button on the bottom of the light bulb ( black hot wire) through the filament and back through the threaded collar (white neutral wire) to the neutral at the distribution panel box. If there is no bulb in the socket and the switch is on there is a greater chance of touching the threaded portion of the socket (or bulb) than the button on the bottom. If the polarity is reversed this threaded portion becomes the hot (live) side of the circuit and there is greater risk of electrical shock.

Polarity matters with appliances that have switches. When the appliance is plugged in the power should only go as far as the switch. If the polarity is reversed the power goes through the entire appliance and then back to the switch. If a loose wire in the appliance comes in contact with the outside case, the entire appliance becomes potentially “hot” electrically speaking and the risk of shock exists even though the appliance is not turned on.

For safety sake:

To keep yourself and family safe, if your home inspector indicates a reversed polarity situation have a qualified electrician check the wiring and make sure that this issue is resolved.

Inspecting Your Homes Attic

Inspecting Your Homes Attic.  There should be an access opening to all attic spaces that exceed 30 square feet and have a vertical height of 30 inches or more. The rough-framed opening should be at least 22 inches by 30 inches. It should be located in a hallway or other readily accessible location. An attic access that is located in a clothes closet is often inaccessible due to permanent shelving installed. There should be headroom that is a minimum of 30 inches above the attic access. In some places “attic” is used more specifically to apply to lofts which have boarded floors and ceilings, and usually windows or skylights, and then “loft” is kept to mean a dark, unboarded roof-space which lacks these features.

Knee walls are vertical walls with an attic space directly behind them. You’ll typically find them in houses with finished attic spaces and dormer windows, as with 1-story houses. There are a couple of ways that you may see a knee wall insulated. The most important areas and most overlooked areas to insulate are the open joist ends below the knee wall. Air sealing reduces heat flow from air movement, or convection. Air sealing prevents water vapor in the air from entering the wall assembly. In a 100-square-foot wall, 1 cup of water can diffuse through drywall without a vapor diffusion retarder in a single year. Fifty cups can enter through a -inch round hole. Air sealing is 10 to 100 times as important as installing a vapor diffusion retarder.

Insulation performance is measured by R-value – its ability to resist heat flow. Higher R-values mean more insulating power. Different R-values are recommended for walls, attics, basements and crawlspaces, depending on your area of the country. Insulation works best when air is not moving through or around it. So it is very important to seal air leaks before installing insulation to ensure that you get the best performance from the insulation.

If you hear noises in your attic and you are unsure as to the source, it’s relatively easy to determine if it’s squirrels – squirrels are active during the daytime. Thus, if you hear scampering and scurrying noises during the day, it’s likely squirrels. Other attic-dwelling critters, such as rats and mice, bats, flying squirrels, opossums, and raccoons, are nocturnal, so they mostly only make noise at night. Flying squirrels are also nocturnal. If the noises happen at night, there’s a strong chance of mice or rats.

The squirrel often finds bedding material by shredding roof or wall paper, and shredding vent ducts and insulation around pipes. The biggest problem is that they chew, and I’ve seen dozens of cases in which they’ve chewed electrical wires. It’s estimated that half of house fires of unknown origin are due to rodent chewing on electrical wires.

Most people will have no reaction at all when exposed to molds. Allergic reactions, similar to common pollen or animal allergies, are the most common health effects for individuals sensitive to molds. Flu-like symptoms and skin rash may occur. Molds may also aggravate asthma. Fungal infections from building-associated molds may occur in people with serious immune disease but this is very rare. Most symptoms are temporary and eliminated by correcting the mold problem in the home.

When your home is inspected by a Professional Home Inspector they are checking for proper ventilation, presence of moisture, proper insulation, mould, proper structural support and signs of rodent or animal entry. Bat feces or vermiculite insulation removal can run into ten thousand dollars or more for removal. Compared to the cost of hiring the Barrie Home Inspector for $200.00 this is a really cost effective way to protect yourself and ensure Peace of Mind on your next Real Estate purchase.


Cottage Inspections in Ontario

Cottage Inspections in Ontario.  “Cottages” in Eastern Canada are generally located next to lakes, rivers, or the ocean in forested areas. They are used as a place to spend holidays with friends and family; common activities including swimming, canoeing, waterskiing, fishing, hiking, and sailing. There are also many well-known summer colonies.

Beware of Shore Line Allowances which are registered on title and can take away up to 66 feet of your waterfront. Removing or closing a Shore Line Allowance can be expensive depending on the charges your Municipality may levy. Ensure you find out prior to closing as this may affect price of property. Conservation authorities may opposing closing of certain allowances making it difficult and more expensive.

Jet pumps draw water using an impeller which throws the water outwards creating a vacuum which draws the water up behind it, creating pressure. The jet pump will not pump air so if line is not completely sealed will lose its prime. To stop the water from flowing back down into the well a one-way check valve is installed on the feeder line.

Septic tanks are usually the only option for your remote cottage sewage system. They may be constructed of wood, steel or homemade and may need immediate replacing. The size of the septic tank required depends on the size of the cottage determined by the number bedrooms.

Tiny Township has implemented a Septic Inspection program at the request of cottagers bordering on waterfront.
That could be a worry for an inexperienced purchaser when you consider that they have found that one-quarter of the systems inspected in Tiny Township have been found to have some type of defect. Orendt says an inspection project on Charleston Lake near Brockville turned up a failure rate of 45 per cent.

If buying a Cottage in Barrie, Midland, Orillia, Rama, Brechin, Lagoon City, Severn Falls or in this general area contact the Barrie Home Inspector for a Professional Cottage Inspection. With over 4,000 inspections and as a Certified Building Code Official your investment is in good hands.


Home Inspector Interview in Florida

Home Inspector Interview in Florida.   The Real Truth About Home Inspections
2011-05-09 22:40:59 (GMT) (WiredPRNews.com – Business, Press Releases, Real Estate)

05/09/2011 // Fort Lauderdale, FL, US // sheiladanzig // Calvin Johnson

In this month’s TRUTH ABOUT series, I take a look at Home Inspections. Do you really need one? We called a few home inspection services and one inspector, Calvin Johnson, who’s both certified and has 30 years of home building experience, was particularly helpful and generous with his advice.

I now know that obtaining a quality home inspection before you sign on the dotted line is the mark of a savvy investor and, when done right with the right company, can ultimately save you a lot of money.
Here are some of the highlights of my conversation with Calvin Johnson.

SHEILA: First off, what exactly is a home inspection?
CALVIN JOHNSON: A home inspection is an in-depth visual evaluation of the condition of your home. The idea is to identify any problems there may be and advise what repairs should be made, both now and down the road. Think of it as viewing your house through a microscope for problems that might not be readily visible to the untrained eye.

SHEILA: I’m a buyer. Do I really need a home inspection if I’ve already seen inside the house and it’s looks in move-in condition?
CALVIN JOHNSON: A home inspection is not the same thing as simply walking through a house to decide whether or not you want to buy it. When a buyer first “inspects” a house, they are trying to decide whether or not they could be happy living there. They gauge room sizes and the overall layout, perhaps count the number of closets, and flip on a light switch or two. This is not a home inspection. A professional home inspector methodically examines every square foot, looking for red flags that might indicate a need for major repairs, such as electrical or plumbing problems, defective drywall, a roof that leaks or a basement that floods, termite damage, etc. These are all important things to know before a home purchase.

SHEILA: Aren’t I protected anyway if something goes wrong?
CALVIN JOHNSON: You may be, if you can prove the seller knew about a problem and didn’t disclose it beforehand but the burden of proof will fall on you and that can be expensive. But, what if a problem exists that the seller doesn’t know about? Maybe that leaking roof hasn’t seeped water inside any rooms yet, but it will eventually. It makes sense to be prepared and fix something while it’s still minor instead of waiting until it’s major. Mold can go undetected for years if you’re not on the look out for it. That old aluminum electrical wiring may have held up until now but do you really want to risk a fire before replacing it?

SHEILA: Okay, so it’s up to the buyer then? If I’m a seller, I don’t need a home inspection, right?
CALVIN JOHNSON: Actually, it’s a very good idea for the seller to get a home inspection, ideally before they even list their house for sale. If you know what’s good and not so good about your home before you put it on the market, not only will you be smarter at setting the price, but you can also take care of minor repairs before a buyer ever sees it. Those minor repairs will reflect your care and love for your home. Buyers will realize they are getting a quality product.

SHEILA: Are all home inspectors pretty much the same?
CALVIN JOHNSON: No, unfortunately not. As with any other type of contractor, quality varies greatly. I strongly recommend taking the time to interview several contractors before deciding. You want a home inspector who takes pride in doing a good job and wants to take care of their clients. If they’re not particularly helpful when you first interview them, are they really the one you want advising you? Ask about their certifications, how long they’ve been licensed and what other qualifications they offer. Ask if they’ll give you a reference or two from several years earlier (so you can find out if any major problems arose that the clients weren’t warned about). And ask to read a sample report to get a sense of how in-depth their inspections are. My reports cover more than 1,000 individual items that I carefully inspect and note for each client. It’s important to ensure that your inspector will do a meticulous job for you.

SHEILA: How long should the inspection take?
CALVIN JOHNSON: Well, naturally, this depends on the size of the house, but a thorough inspection of a typical home should last at least 2 hours. My inspections usually take two to three hours on an average-sized home. It’s not really possible to do a thorough job in less time than that. Beware if someone tells you that they can do it faster.

SHEILA: Should I be there for the inspection?
CALVIN JOHNSON: Yes, if you can. This is a terrific way to learn the ins and outs of a house, particularly for buyers who are unfamiliar with the property. When clients are with me, I also point out things that may not need to be included in the report but would benefit from, say, an upgrade to avoid problems down the road. It’s a terrific learning experience. I tell my clients to bring a notebook, two pens and a digital camera. Be sure to wear comfortable clothes and shoes because you may be in the trenches a bit with the inspector.

SHEILA: What exactly can I expect from a good home inspector?
CALVIN JOHNSON: A good home inspector will give your home a thorough going over, both outside and in. They’ll look for telltale wall cracks and bulges, check for straight, plumb walls and reasonably precise corners, floor level disparities due to settling and other issues, even potential drainage issues — all of these come under the umbrella of a quality home inspection. An inspector can tell you if the soil grading is acceptable, that is, if the rainwater will pool against the foundation instead of draining away as it should.
I inspect the exterior for signs of active foundation settlement, which can weaken the frame of the home, as well as other structural problems, water or insect damage and wood rot. I evaluate the condition of every door and every window, and the condition of the roof — whether it will need replacing soon or bears the marks of a slipshod replacement job, and whether any leaks exist, all of which can be very expensive issues to remedy if you’re caught unawares.
I also check for proper insulation, the condition of walls and ceilings, cracks and caulking, evidence of Chinese drywall, which has become a real problem in recent years, and for the likelihood that lead paint may have been used on the walls. I look for evidence of insect damage, mold and mildew (both present and past), asbestos, radon and other potential health hazards.

SHEILA: Are the heating and air conditioning systems checked?
CALVIN JOHNSON: Absolutely! A good inspector will always test the heating and cooling systems, verify if the condenser unit coils or fan blades are in good condition, for example, and estimate the remaining life span of the systems.

SHEILA: What about the water pipes?
CALVIN JOHNSON: All visible plumbing is examined. I even check the type of shower pan because metal shower pans only last about 10 or 15 years compared to more superior materials. I check the drain lines, water flow/pressure and how much hot water the water heater provides. I look for water leaks, noisy pipes, the presence of lead pipes, which is a health hazard, and even systems where pipes have been “married” to dissimilar materials, because of the high risk of corrosion and leakage.

SHEILA: Can you advise me about the electrical system?
CALVIN JOHNSON: Certainly. I check to see whether the house is properly wired and grounded, whether there are oversized fuses or breakers in the main panel, and look for any exposed wires or frayed cables inside and out. All of these are very real fire and health risks.

SHEILA: Can the inspector fix the problems?
CALVIN JOHNSON: I can but, unfortunately, most don’t. I have a team available to make any necessary repairs at a very low cost to the consumer. Over the years, I realized that offering quality repairs was something my clients really wanted, particularly long distance buyers who don’t know any reputable, local contractors. I used my decades of home building experience to build a top notch team.

SHEILA: What if there’s a problem? Can I still buy or sell the house?
CALVIN JOHNSON: Don’t despair if your home isn’t perfect. They rarely are. Unless there is a serious structural problem that would prevent a sale, most issues can be dealt with pretty readily. Tackling a small repair can often prevent it from becoming a larger, more expensive one down the road. And, it’s helpful to know that, for example, the roof is fine now but will need to be replaced in, say, 5 or 10 years. That’s normal, but it helps to know now so you’re not caught unawares. And never forget that knowing a home’s strengths and weaknesses helps when negotiating a contract.

By Sheila Danzig, Editor of The Truth About Series

Posts Related to Home Inspector Interview in Florida

  • Home Inspection Tips from HomeLoans.org

    Home Inspection Resources For First Time Home Buyers Why get an inspection? When purchasing a home it is very important to have factual information regarding …

  • Do you really know your home? Listing Your Property

    I have had many experiences in my combined 30 years in real estate, contracting and home inspections and there is none more difficult than when …

  • Who Is Your Home Inspector ???

    The Boston Globe recently had an article about Home Inspectors, the quality of inspections and the source of their inspection referrals. This article unfortunately points …

  • Water Problems and Solutions for Home Owners

    Most water problems that homeowners encounter can usually be by controlling water above ground. Simple but effective means of controlling those above-ground problems may prevent …

  • Moisture in Electrical Service Panels

    In electrical inspection, visual assessment of the electrical service apparatus is a vital component of the procedure followed by expert home inspectors, whose observations are …

Furnace Maintenance Basic Tips

Furnace Maintenance Basic Tips.  Save yourself money and repair costs by following our simple maintenance steps.

Heating system and maintenance

In general, heating systems are easy to maintain and are usually trouble free. Efficient operation is a function of good regular maintenance. There are several things you can do to keep your heating system in top condition no matter the type of furnace you have. When a heating or cooling system fails, it is typically one of three things creating the issue ( the heat/cold source , the distribution system and/or the thermostat) . If the furnace or A/C doesn’t work , chances are the issue is at the source. The unit may have lost power , fuel may not be reaching the unit or the fuel may not be igniting. If the unit turns on but the cold or warm air isn’t reaching the rooms , the blower or distribution system may be faulty. A faulty thermostat or control , could keep the unit from turning on or cause it to turn on and off repeatedly. Whatever the problem, start with the simplest procedures. In most cases, all it takes is patience and common sense.

Before working on the system , take these preliminary steps:

Make sure the unit is receiving power . Make sure the unit doesn’t have a blown fuse or tripped breaker. Some furnaces have a separate power entrance on a separate panel and some have fuses mounted on or in the unit.
If the unit has a reset button , let the motor cool down and press the button. If it doesn’t work right away , wait a little while and try it again.
Make sure the units power switch is turned on. Remember , the unit may have a separate power switch.
If it is a gas burning unit, make sure the gas is on and the pilot light is lit. If it’s an oil burning unit check and make sure there is an adequate supply of oil.

If working on the system is necessary remember these important safety factors :

Before doing any work on the unit , make sure all power to the unit is turned off. Remember the unit could be on a separate panel. Make sure the breakers are tripped or the fuses are removed for the particular unit. If your not sure which breaker or fuse it is , trip the main breaker or remove the main fuse to shut off the power to the entire house.
If the unit is constantly tripping breakers or blowing fuses then there is an issue with the electrical. If this is the case , call a professional service person.
If your home smells of gas , leave your home immediately, leave the door open and call the gas company to report a leak. Do not turn any lights on or off and do not re-enter your home.

Keep your furnace clean

Dirt is your furnaces greatest enemy. It can waste fuel drastically lowering the units efficiency. Dirt affect three basic components on your furnace ( the filter , the blower and the motor ) so keeping them clean is the most important part of furnace maintenance. A disposable furnace filter should be replaced monthly during periods of continuous use. To check the filter , simply remove it and check to see if it looks clogged. If it looks clogged replace it regardless of how long it has been used. Install the filter with the arrow on the outer edge pointing towards the blower on the inside of the furnace. The filter size should be marked on the outer edges of the filter.

A permanent filter can usually be cleaned with a filter coating chemical which should be available at your local hardware store. Clean this filter according to the manufacturer’s instructions which may be located in the furnace housing.

Cleaning the blower assembly is also important for maintaining your furnace because the openings can often become clogged with dirt. To clean blower, remove panel that covers filter to gain access to blower or panel on front of furnace. This panel may be slip-fit on hooks or held by series of retaining screws. Access to inside of blower is usually gained by sliding out fan unit, which is held on track by screws. With toothbrush, clean each fan blade and spaces between blades. Then, with vacuum cleaner hose, remove all dirt and debris loosened by brushing. Also vacuum belts and pulleys. Wipe motor housing clean to prevent heat build-up in the motor.

Keep your furnace motor lubricated

To keep your furnace motor running cool, make sure it’s clean. Most furnace motors are permanently lubricated and sealed by the manufacturer however some have covered oil ports above the bearings near the motor shaft. If your furnace motor has oil ports , it should be lubricated annually .Apply two or three drops of 10-weight non-detergent motor oil (not all-purpose oil) to each port. Do not over lubricate. If the blower shaft also has oil ports then it should be lubricated as well. If the blower shaft has grease cups instead of oil ports then remove the caps from the grease cups and fill the cups with bearing lubricant which should be available at your local hardware store.

Inspect on your furnace belt

While lubricating your furnace motor, it is a good time to check the belts. If the belts are worn or frayed , replace them with new one’s that are the same type and size. If the belt squeaks while the motor is running , spray it with fan belt dressing which should be available at your local hardware store. These steps should hopefully help keep your furnace healthy and your family warm for years to come.

To keep the unit in good shape , have it professionally serviced annually. The end of the heating season is usually the best time to do this because of off-season discounts and the company won’t likely be as busy. It a good idea to have your air conditioning unit serviced at the same time.

Nathan Pile
Barrie Home Inspections

Home Inspection and Drywall Basics

Home Inspection and Drywall Basics.  One of the most common deficiencies found during a home inspection is cracks in drywall or plaster. Cracks are common in plaster and drywall because they are brittle and rigid but are supported by materials that are not equally as rigid. Plaster and drywall are attached to flexible wood structures on foundations that rest upon compressible soil. Wood expands in humid weather and contracts in dry weather. Plaster and drywall are too rigid to move with the wood and therefore cracks will appear when there is any movement in the house or foundation.

Drywall installation involves nailing or screwing the sheets to the studs. Drywall installers cut the sheets to fit, and holes must be cut to accommodate pipes and mechanical equipment. The sheets are then fastened to the studs in a process called hanging. While most drywall installation used to use nails, screws are now the most common. Drywall is normally installed perpendicular to (across) the ceiling joists and wall studs, and the ceiling is always installed first.

Special moisture resistant drywall is used where excessive moisture may be a problem, such as bathrooms. In most cases, the moisture resistant drywall is green. Fire-rated drywall (Type X) is used where building codes require it. Typically in garages and under stairs.

After the drywall is installed, special metal corner strips (“corner bead”) is installed on all corners. This helps to protect the edges of the drywall and provide a nice straight finished edge. Joint compound (drywall mud) is used to finish all joints, nail heads and corners. In most cases, two or three coats of compound are needed at all taped joints. The texture coat is applied last.

The finished quality of your drywall will have a large impact on the beauty of your home. Most drywall cracks can be eliminated by just applying joint compound, but plaster cracks should be widened to 3/8 inch down to the lathe cleaning it out and wetting it with Elmer’s glue diluted 50% with water. If sections of plaster are disconnected from the lathe, they can be secured with “plaster buttons” prior to plastering the crack. Press fresh patching plaster, not joint compound, into the crack so that it is forced into the spaces between the lathes.
When plaster ceilings are full of cracks, apply drywall directly over the plaster and don’t bother patching. It’s just not worth the effort. Make sure the drywall is screwed to the floor joist or strapping and not just to the lathe.

Buildings built between 1930 and 1950 may have metal lathes under the plaster. You’ll notice when you try to hang a picture! You can distinguish between metal or wood lathe by hitting the wall. Metal lathe walls tend to be much stiffer.

This home maintenance tip and maintenance advice is brought to you by the Barrie Home Inspector and Orillia Home Inspector

Barrie Home Inspector © 2013 Frontier Theme